Thursday, May 18, 2017

strawberry rhubarb crumble

I love making my fresh peach crumble and wanted to recreate that dessert with my boyfriend's favorite fruit filling - strawberry rhubarb! He prefers his rhubarb desserts to be more on the tart side, so this recipe was created with that in mind. Modifying the recipe is pretty simple and the ingredients can be doubled for a 9x13 inch baking dish. Let me know if you have any questions and if you try this recipe, please share your results with me! Printer friendly recipe is at the bottom of the post.

INGREDIENTS
For the filling:
3 c strawberries
3 c rhubarb
1/4 c light brown sugar
1 tsp orange zest
1/4 tsp cinnamon
1/4 c orange juice
2 tsp cornstarch

For the topping:
3/4 c all-purpose flour
1/2 c granulated sugar
1 tsp baking powder
1/4 tsp cinnamon
1/4 tsp nutmeg
1/4 tsp salt
1 egg, lightly beaten
1 tsp vanilla extract
1/2 c butter, melted and cooled
(optional) 1/4 c slivered almonds, toasted
(optional) vanilla ice cream foà la mode

INSTRUCTIONS
1. Preheat oven to 375 degrees.
2. For the fruit, toss the strawberries, rhubarb, brown sugar, orange zest, and cinnamon together in a large bowl.
3. In a measuring cup, dissolve the cornstarch in the orange juice and then mix it into the fruit.
4. Let sit for 15 minutes and then pour the mixture into a greased 8x8 inch baking dish.
5. In the meantime, get the topping together. Combine flour, granulated sugar, baking powder, cinnamon, nutmeg, and salt in a bowl.
6. In a separate bowl, lightly beat one egg and mix in vanilla extract. Stir egg into flour mixture until it resembles coarse crumbs. Toasted slivered almonds can be mixed in for more crunch. Crumble on top of strawberry and rhubarb mixture.
7. Pour butter evenly over the topping.
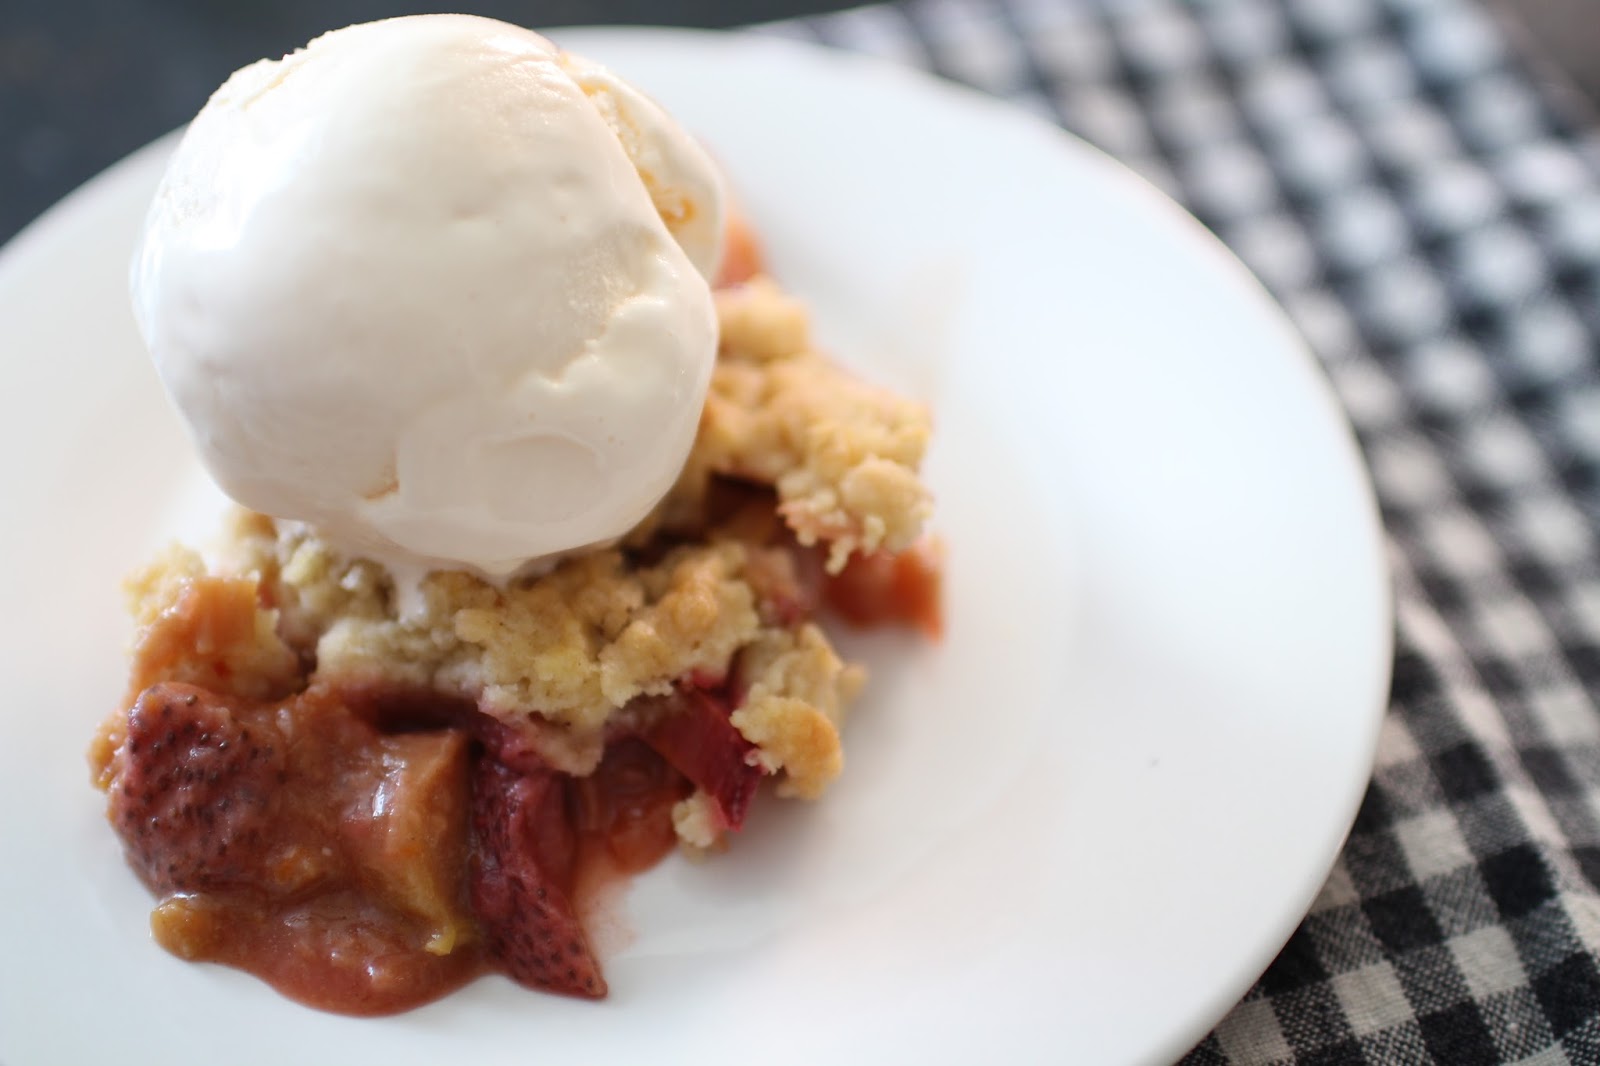
8. Bake for 45 minutes or until golden brown. Best served warm with ice cream or served cold with Cool Whip.


Tag me (@nowandjenn) in your photos if you tried this recipe!

xo,
jenn
.....................................


print recipe

Strawberry Rhubarb Crumble
A childhood favorite. Good balance of sweet and tart. Best served à la mode.
Ingredients
  • 3 cups strawberries
  • 3 cups rhubarb
  • 1/4 cup light brown sugar
  • 1 teaspoon orange zest
  • 1/4 teaspoon cinnamon
  • 1/4 cup orange juice
  • 2 teaspoons cornstarch
  • 3/4 cup all-purpose flour
  • 1/2 cup granulated sugar
  • 1 teaspoon baking powder
  • 1/4 teaspoon cinnamon
  • 1/4 teaspoon nutmeg
  • 1/4 teaspoon salt
  • 1 egg, lightly beaten
  • 1 teaspoon vanilla extract
  • 1/2 cup butter, melted and cooled
  • (optional) 1/4 cup slivered almonds, toasted
  • (optional) vanilla ice cream for à la mode
Instructions
1. Preheat oven to 375 degrees.2. For the fruit, toss the strawberries, rhubarb, 1/4 cup brown sugar, orange zest, and cinnamon together in a large bowl.3. In a measuring cup, dissolve the cornstarch in the orange juice and then mix it into the fruit.4. Let sit for 15 minutes and then pour the mixture into a greased 8x8 inch baking dish.5. In the meantime, get the topping together. Combine flour, granulated sugar, baking powder, cinnamon, nutmeg, and salt in a bowl.6. In a separate bowl, lightly beat one egg and mix in vanilla extract. Stir egg into flour mixture until it resembles coarse crumbs. Toasted slivered almonds can be mixed in for more crunch. Crumble on top of strawberry and rhubarb mixture.7. Pour butter evenly over the topping.8. Bake for 45-50 minutes or until golden brown. Best served warm with ice cream.
Details
Prep time: Cook time: Total time: Yield: 6-8 servings

Saturday, June 20, 2015

참치김치전 chamchi kimchi jeon (tuna kimchi patties)

Oh man, tuna kimchi patties.

My family is partially Korean, so a lot of my mother's recipes have been inspired by our Korean heritage. The following recipe is my mother's twist on the beloved 'chamchi kimchi jjigae' which translates to tuna kimchi stew. The stew is considered a staple in Korean cuisine and is typically served with a bowl of rice and some sides (Korean food is all about the sides).

I know tuna + kimchi may sound strange, but it's one of my favorite combinations. There's a rich, umami flavor that comes from the fish and the kimchi's acidity adds the perfect amount of brightness. It's like what pickles are to the burger. You may decide to make this and think it's nothing special, but this is comfort food to me. These tuna kimchi patties will always remind me of home and my mom.


INGREDIENTS:
2 cans/pouches tuna (lightly drained)*
1/2 firm tofu
1/2 cup soured kimchi (chopped)
1 egg
1 clove minced garlic
2-4 Tbsp all-purpose flour
Safflower oil for cooking**

*I've never used fresh tuna before, but I'm sure it would make this recipe even better.  Definitely on my list of things to try and if you guys make this with fresh tuna, let me know how it turns out!  You could also use korean canned tuna, which is pre-marinated in gochujang, but I feel like that may make these cakes too salty and take away from the kimchi flavor.

**Safflower oil is a light oil that is great for pan frying foods.  It has a higher smoke point, so it reacts less quickly to oxygen and is more suitable for high temperature cooking.  If you don't have safflower oil, no need to worry, because any neutral, high smoke point oil will work.  Click the following link to read more about smoke point and oils.


DIRECTIONS:
1.) Place tuna, tofu, kimchi, and garlic in a large bowl and combine well.  Then add the egg and flour to help bind the patties together.


 2.) Heat up two tablespoons of oil in a nonstick pan over medium to medium-high heat.  Form thin patties, 3 inches in diameter, with your hands and place in them in the pan - about 2-3 minutes on each side.


3.) When patties are nicely browned and crisp, remove from the pan and let rest on a paper towel.  Heat more oil in the pan and add the next batch of patties to the pan.  Recipe makes about twelve tuna kimchi patties.  Best when served immediately.  Enjoy!


Tag me (@nowandjenn) in your photos if you tried this recipe!

xo,
jenn
.....................................

Tuesday, September 9, 2014

savory oatmeal w/ spinach & poached egg

When I use to think of oatmeal, I would picture the Quaker Oats packets in its sweet variety of flavors. I'm pretty sure I've tried every flavor from the apple cinnamon to the dinosaur egg and everything in between.  

As I got older though, I began to realize just how sugary and almost nauseating these instant breakfasts were. It's basically just sugar slop. I also learned that the oats in packets are pressed even thinner than quick oats and that's why they have no texture to them after being microwaved. Needless to to say, I stopped eating oatmeal for a while.


My mom eats her oatmeal with salt instead of sugar and that's something that I've adopted as well.  One of my favorite combinations for savory oatmeal is with some spinach and a poached egg.  This recipe is light and nourishing, and it keeps me satiated till lunchtime.


INGREDIENTS

1/2 Tbsp. vinegar
1 large egg

1/2 cup old-fashioned oats (or steel cut oats)

2/3 cup water (or chicken broth for more flavor)
pinch - 1/2 tsp salt (salt to taste)

1/4 cup frozen spinach (or fresh - steamed)

1/4 tsp of salt
pinch of black pepper

1 tsp. extra virgin olive oil

(optional) parmesan cheese


DIRECTIONS

1.) Add two inches of water w/ vinegar to a saucepan and bring to a light simmer on low to medium heat.  The vinegar helps the egg white coagulate. It does change the flavor a bit, but I don't mind it.  I think it complements the extra virgin olive oil.


2.) When you start seeing a tiny bubbles, gently slide egg into the water.  Cook for about 4-5 minutes.

Make sure the egg is completely covered and submerged in the water.  If not, gently add some hot tap water to the saucepan.


3.) While you're waiting for the egg to poach, prepare your oats and spinach.  Combine oats and water and a pinch of salt in a deep bowl.  Microwave for 2 minutes.  Yes a deeper bowl is required for the oats to expand without spilling over.  If you're using steel cut oats, you will need to increase the water and cook time.  Also, if you're using chicken broth instead of water, you can leave out the pinch of salt.


4.) Defrost the spinach in microwave for 1 minute.  If it is still cold to the touch, microwave for 10-15 seconds. Sprinkle with a pinch of salt and pinch of pepper.


5.) The egg should be poached by now and can be removed from the saucepan with a slotted spoon.  Assemble all the ingredients to your liking and drizzle with extra virgin olive oil.  A sprinkling of parmesan doesn't hurt either.  I removed the feathery, uncoagulated parts of the egg for more appealing blog photos.  I don't do that in real life.


Tag me in your photos if you tried this recipe!


xo,
jenn
.....................................

Tuesday, July 1, 2014

fresh peach crumble

With summer coming to an end, I wanted to use the last of my fresh peaches to make a peach crumble.  I'm not a very good baker, but this recipe seemed simple enough for me to tackle.  To my surprise, it turned out really well, so I just had to share it with you guys.


INGREDIENTS:
6 cups fresh & ripe peaches, sliced (5-6 whole peaches)
1/4 cup packed brown sugar
3 tablespoons all-purpose flour
1 teaspoon lemon juice
1/2 grated lemon zest
1/2 ground cinnamon
(optional) pecans, almonds, hazelnuts, walnuts, or pistachios

Topping:
1 cup all-purpose flour
1/2 cup sugar
1 teaspoon baking powder
1/2 teaspoon vanilla extract
1/4 teaspoon salt
1/4 teaspoon nutmeg
1/4 teaspoon cinnamon
1 egg, lightly beatened
1/2 cup butter, melted and cooled
(optional) vanilla ice cream

DIRECTIONS:
1.) Preheat oven to 375 degrees.  Place peaches in a greased, shallow 9x13 (2 qt.) baking dish.

2.) In a small bowl, combine brown sugar, flour, lemon juice, lemon zest, and cinnamon; sprinkle over peaches.


3.) Combine flour, sugar, baking powder, salt, nutmeg, and cinnamon.  Stir in egg until mixture resembles coarse crumbs.


4.) Pour butter evenly over the topping.


5.) Bake for 40-45 minutes.  Serve warm with ice cream if desired (it's awesome with ice cream).  


(modifed recipe from Taste of Home)


Tag me (@nowandjenn) in your photos if you tried this recipe!

xo,
jenn
.....................................

Monday, May 5, 2014

how to: self-rising flour

All you have is all-purpose flour on hand? No worries! Make your own self-rising flour with this quick and easy substitution recipe. All you need are these 3 ingredients! 

INGREDIENTS
1 c. all-purpose flour
1½ tsp. baking powder
¼ tsp.salt

DIRECTIONS
1. Measure all ingredients and combine well.


NOTE: Measurements to equal each cup of self-rising flour.

Tag me (@nowandjenn) in your photos if you tried this!

xo,
jenn
.....................................